Web Design Process: Steps, Benefits, and Tips to Follow


The web design process is a complex strategy involving various steps that start with setting the goals and planning and end with the post-launch efforts. Simply put, the process is a multi-step site creation plan describing the work volume and necessary resources.
The design-related impressions of a user determine if they will be willing to buy your product or service. As website creators, web designers build flawless visuals that will catch the user’s eye and appeal to the target audience.
The Limeup team has over 10 years of experience designing various solutions. We’ve mastered our website design process to prevent resource waste for clients and help them create robust web solutions at an optimal cost. Keep reading to reveal our tips and tricks and expand your knowledge on designing customer-oriented products.
What is a web design process?
The process stands for creating a website within a multilayer design process, including planning future web pages, visual part concepts, evaluating user experience, etc. As a combination of tech and graphic skills, web design is an excellent opportunity to present your business online and reach more customers.
According to Forbes, visually appealing and high-functioning websites empower brands and credibility and lead to more organic traffic. The actual process of web design requires designers, SEO specialists, developers, and other specialists to present a full-fledged working website. It involves creating a site structure, choosing a brand’s unique colors and fonts, etc.
Note! A web designing process requires your attention regarding:
- UX and UI. Keep them consistent for all of your web pages.
- Visual hierarchy. Your visuals should be categorized into more important and less important ones. The important elements should be eye-catching and guide users to the right destinations or actions.
- Call-to-action. Each web page should have a purpose. Use call-to-action buttons to point your website visitors to the opportunities they can get on your site.
- Loading speed. Optimize the images and keep the code clean for your pages to load quickly. Fast loading time will improve your SEO ranking and keep your site visitors pleased.
As a result of web designing, the client receives a cutting-edge setup according to their request and web design trends. A responsive design strategy means creating a design that will adjust to the screen and device type without the need for you to create multiple static layouts.
10 web design process steps
The resources required for creating a site differ from case to case. One business may build a landing page, while another launches a big web design project to develop a page-rich site. Thus, the particular characteristics of a task depend on your requirements and the conditions under which you will work.
Considering the variety of website types and goals, the purpose of our 10-step process guide is far from forcing you to act as someone tells you. Instead, we aim to give you the checklist to serve as your project’s foundation. You can skip/add/remove the web design process steps as your project requires. Also, you can adjust aspects of the process to your needs.
Below, you can see our view of a good website creation process:
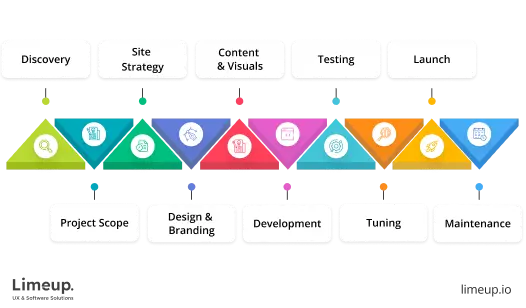
Step 1: Discover essential data
The initial stage involves brainstorming and collecting the necessary information to help you grow your idea. For the brainstorming part of the discovery, you can apply your potential customers, partners, team members, or stakeholders.
Hereafter, you should conduct some research on your future website. Try to answer the following questions:
- What service, product, or concept will your website promote?
- What goal will your website serve? For example, you can use the site to sell products, inform people about your brand identity, showcase your achievements, etc.
- What industry conditions will your website operate in? What has happened with this industry in recent years? Has it suffered a decrease in revenue? Or does it show a positive growth tendency?
- Who is your target customer? What is their purpose for using your site?
- What about the competition in this industry? Is the sector overloaded with businesses like yours? What do all these businesses have in common? How do they differ?
- What unique features or values can you offer to your customer? How can these help you outstand the competition?

By answering these questions, you will easily prepare a creative brief for your project and determine if the target industry requires websites like yours. This, in turn, will help you evaluate the chances of success before moving to the following steps. Also, this stage will help you set precise goals for the entire project by considering your audience’s preferences, competition, and market trends.
You may wonder what will happen if you skip this stage. There are different scenarios we can outline. There is always a chance that you will be lucky enough and win a fortune by relying on your gut feeling. However, skipping the discovery stage can lead to miscalculations on the project scope definition and even the creation of the wrong or irrelevant site.
Step 2: Define the project scope
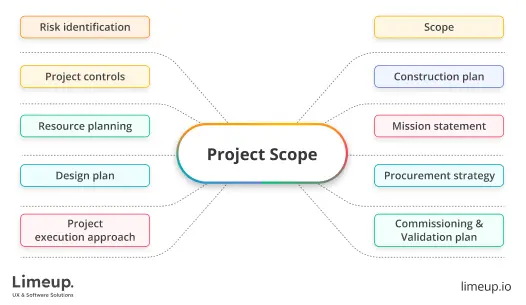
When you think about designing a site for the first time, your goal is quick to achieve. However, breaking your “big” goal down into actionable and achievable tasks turns out this is not that easy.
The purpose of the scope definition is to materialize your “big” goal and turn it into a doable workload. This process involves:
- Defining project timeline, budget, and resources.
- Outlining project goals for each phase.
- Breaking the work scope down into phases.
- Defining acceptance criteria for the tasks.
When planning the design workflow, consider the list of must-have pages on your site. The page list entirely depends on your site’s purpose. Some pages, though, are obligatory for the users to navigate a site smoothly. For instance, the home page is the most important one. It should convey the purpose of your site. To present your message clearly and beautifully, you can hire web designers for help. Skilled design experts will share their experience and assist at each design stage.
The checkout pages and the ones where your products or services will be listed are no less important. Think about how they will be presented on the same page (whether it will be a picture plus description plus call to action, the service list plus call to action, or some other format you prefer).
One more critical page is Contact Us. If you want to finish user interaction with your site by them leaving contact details, put effort into making this page eye-catching and unobtrusive. Some other pages you can add to your website are a blog post section and a client reviews section.
Step 3: Plan out the site strategy
Before designing a site, you should create a sitemap. A sitemap is like a site architecture that demonstrates page hierarchy and how one page relates to another. In other words, by creating a sitemap, you get an outline, build the logic of your site, and put all your pages in order.
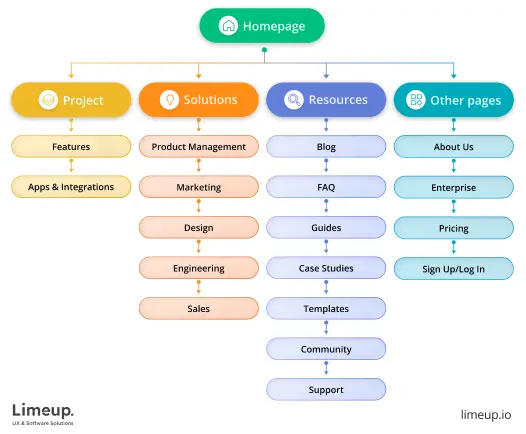
Pay particular attention to the pages that lead a user to some vital action. Try to make the user path to completing this action as short as possible. Typically, essential activities should take at most 3 clicks to complete.
At this stage, you must also develop the logic of how the main pages will be connected. Sure, your website can be enriched with new pages later on. But when it comes to the main ones, those should be well-planned early.
Step 4: Dive into design and branding
Statistics show that 94% of the first website impressions come from design. But before starting a full-scale web setup, it’s essential to visualize your idea. For this, create wireframes. A wireframe is far from the final version of a design. Instead, wireframes help you visualize and frame the most critical site elements while keeping a project scope in mind.
At this stage, you can involve the help of any of the web development companies. The design agency of your choice should cooperate with the website development team to ensure the suggested web design can be translated into the code.
You may wonder why it’s essential to create wireframes if you can start building a full-scale design right from the beginning. If you choose this path, you will likely get into the trap of spending too much time polishing and mastering the details that may turn out unnecessary or irrelevant. When looking at the general picture, you can reveal that the design elements you worked on for so long do not fit your design. To save you time and provide a 360-degree view of your design idea, we strongly encourage you to start by building a wireframe.
After your team agrees upon the wireframe, you can expand it into a mockup. The difference between mockups and wireframes is that wireframes are like the skeletons of website projects. They give you an understanding of the page structure and the main components and do not reflect the page’s visual design.

Mockups, in turn, are high-fidelity renders of the final version of the design. They still need to focus on more detail but provide you with an understanding of what your design will look like. When creating mockups, web designers balance what is visually appealing and what is practical or functional. If you have a variety of page types on your website, your team needs to create a mockup for each critical page (home page, contact forms, about us page, etc.).
When working on the site structure, keep web design standards in mind. For example, the website menu is typically placed at the header or on the left side of a screen. It would be uncomfortable for your website visitors if you put it on the right side or at the footer. Another example is the website logo. It is typically placed on the upper left side.
Sure, being original can help you attract visitors. But try to choose only those original ideas that do not break common web standards. By following these rules in each of your website design process steps, you will prevent situations when your users feel frustrated because they cannot find the button they are looking for.
Another part of this task is to create branding guidelines. This set of visuals, colors, typography, and design elements is called a style guide. You will use them in your site’s design and logo creation. The function of brand guidelines is to recognize your company, among others.
Step 5: Create content and visuals
Creating the content and visuals for web design projects is no less important step. This step does not depend on the previous one. Content specialists can work on the fifth step in parallel with your designers, creating the final design.
Content
Creating content is an essential part of web design. The main functions of the content on your site are:
- To engage users
- To enhance your SEO strategy
Here is what we can tell you on this matter. To understand all the details about the product, a user needs something more than just looking at attractive product images. They need a product or service description highlighting its characteristics and distinguishing features. So, the text will guide your users toward their goals and help them navigate your site.
Another function of the content is to promote your site in search engines by keywords. You can use the Google Keyword Planner to check the most popular keywords in your niche and integrate them into your site. Another helpful tool that can be used with Google Keyword Planner is Google Trends. There, you can learn more about the web design trends that raise user interests and incorporate novel ideas into your business.
Add the keywords to your main tags for the search engine to identify what your website is about. Integrate the keywords into the content as well. Keyword-rich content will help you take the top position on Google and boost your search engine optimization.
Photos and visual brand elements
After you prepare the content, you should accompany it with visual elements. For this, you may need the help of a professional photographer. You can take photos of your team at work to place them in the About Us section and share them on your social media. When working on this task, keep your brand’s identity in mind. You can integrate branding elements into the photos.
Besides, you may also need product photos. Adding pictures makes your site easier to digest and increases engagement. Your product/service photos should be of high quality, but you also need to ensure that their size is not too massive and does not affect the site’s performance. If so, use the optimization tools to compress your photos and images.

Step 6: Website development
You have your mockups ready; you know who your target user is; you check the site’s navigation. Now, it’s time to implement all these results into reality. During the web development process, the design of your site is translated into code by a software development team.
This and the previous stage are the most responsible and require the most attention from the technical team. The web designing process can take longer than the rest of the steps. Be ready for that — an excellent visual design takes much time to be implemented.

Many companies prefer to use website builders or a content management system to create sites and add new content. Such a strategy has its pros and cons. On the one hand, by using such tools, they can manage websites by themselves without the help of a technical team. On the other hand, they need more customization opportunities and must choose between the available design themes many other businesses use. This, in turn, makes them less unique and competitive.
Step 7: Testing
After you finish the whole process, it’s time to test what you’ve created and ensure the entire website is up and running. Site testing can be subdivided into two phases. The first testing phase is purely technical. At this phase, you will test how your website performs. Test each page, each button, and each link to ensure your web design works as expected. Make sure there are no errors or broken links, and start fixing them, if any. If errors appear somewhere, ask your development team to review the code and fix them.
Another part of the testing workload is intuitive usability testing. You will know what you expect from each element as a website creator. So, you can be one of many people who test the site. To make this part of trying unbiased, involve people who see the website for the first time.
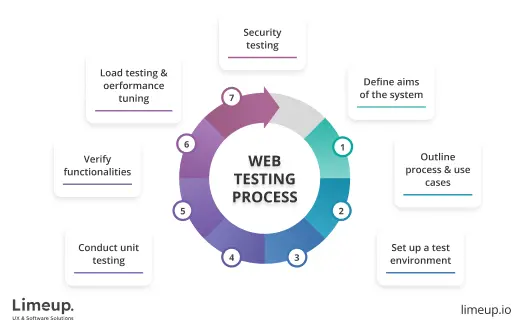
For user testing, it’s not obligatory to gather the group of your target audience only. Why so? Because your website should be understandable and accessible for any user, not just your direct customer. You can even involve your family members or friends at this step. Ask them to perform a particular action on your site or reach a specific goal. The audience should intuitively know how to navigate your website and find the necessary information. If something confuses users on your site, changing the confusing element or removing it altogether is a good idea.
Step 8: Website tuning
Collect early feedback from the two site testing phases and use it to improve your web design. If a problem requires you to change the visual design upside down, wait to postpone this task until the release. It will be much cheaper and more efficient to fix problems before the website launch than after it goes live.
Sometimes, improving what still needs to be lived seems tedious and unmeasurable. But if you improve your website at this stage, you’ll eliminate many potential usability problems that could discourage users from engaging with your solution.

Step 9: Website launch
This is probably the clients’ favorite part of the website design process. Your website is ready to launch after you test and improve the site. It’s time to choose a reliable hosting provider, make up the domain name, and go live. But even if you double-checked everything on the site, do not expect things to run perfectly. Chances are that your users will detect some usability problems or find an error you’ve missed.

Nothing is perfect; neither are websites. Even the top and popular sites globally sometimes need to be corrected or corrected. That’s why your task is not to make everything perfect. Your mission is to respond to flaws promptly and fix them. After all, running a site is an ongoing process that requires your attention and care.
Step 10: Post-launch maintenance
A new website requires a lot of attention. Support and maintenance provided by a professional team will help ensure your website performs well under different conditions and traffic volumes.
For this purpose, you can hire a web design company in the UK from our top 20 list. The best companies usually offer support and maintenance as an integral part of their design services. By choosing a partner from this list, you will not need to look for one more company to support your site, as the UK-based firms will provide full-cycle design and development.
Over time, web design trends change, and trendy design ideas need to be updated. Stay concise to minimize the situations you have to modernize the design. This way, you will create a web design that will be relevant for years. Sure, the time will come when you will have to update and modernize your site. However, the more laconic your design will be, the less effort it will take to keep it up-to-date.

Benefits of implementing website design process
Benjamin Franklin once said, “If you fail to plan, you are planning to fail.” Indeed, good web design process planning can prevent you from failure and save you a lot of resources that could be lost or wasted because of strategic mistakes. Let’s discuss the benefits you can get from planning the process thoroughly. Here are the main ones:

Save money
One of the stages of website creation steps is collecting the project requirements and preparing the documentation and project files. The description of the project goals is accompanied by the specifications, where the required resources are listed. By planning the process, you can easily adjust the process to your budget and expectations. You will see the overall picture of tasks and processes and distribute the resources as efficiently as possible. This, in turn, will lead to significant money savings.
Save time
Each unexpected project delay can cost you time and money. Moreover, it affects your team’s motivation and can lead to frustration and a lack of enthusiasm about the entire project. With a well-planned web design process, you prevent such situations from happening. You will distribute the time, effort, and resources in the optimal way that suits you and your team. Instead of thinking about the best strategy in the course of work, you can develop the plan in advance and move smoothly from one step to another.
Prevent issues
Those outside the tech industry may wrongly think designing a site is just about the design itself. However, creating an intuitive and engaging site with comprehensive knowledge of its aspects is possible. For instance, these include the development process, user feedback, testing, post-launch effort, etc. By following all the steps in the website design process, you avoid many website problems. On top of that, the quality of brainstorming also depends on how well you guide your team. By having a clear plan, they will better understand what you expect to get at the end.
Get a better result
Having no plan for creating a site means relying on assumptions and gut feelings. This, in turn, can lead to you needing to build the solution you expect. By having a plan and sticking to it, designers minimize the risks of disappointment at the end as they track the project’s progress in real-time.
Moreover, the suggested web design process includes testing and tuning the site to make it even better than expected. At this design process stage, you will collect early feedback to improve the solution and fix all errors.
Reduce the risks
If you plan out the process, consider the risks in advance. You list resources needed to complete your tasks, distribute the workflow, set a realistic timeline, etc. This allows you to look deeply at your design process and all the risks that may appear your way. You can develop an effective risk management strategy for all steps and get the best project results.
Give the user what they need
What a business expects from web design services at the beginning and what they get at the end are two different things. The reasons for that are not necessarily pessimistic. As we said above, good web process design includes testing and tuning. You improve the solution at this step and can even change your view of a good website.
During all these processes, it is essential to have a clear vision of what your customers expect to get. The web design process we suggest above is user-centered and encourages you to keep your audience in mind before the start and throughout the project. Thus, by leveraging our design process, you will hear your user’s voices, collect their feedback, study their behavior, and more. Doing so will surely provide your target audience with a solution they will love.
Dos and don’ts in the web design process
In this section, we will focus on the creative aspect of web designing. Remember a few important things to do and avoid when planning the entire process. The main rule is that building a website is all about user experience. Your task is to turn this experience into an exciting and memorable journey.
Dos in web design
Put yourself in the user’s shoes
The main goal of your site will be to tell users more about you and your business and encourage them to purchase your products and services. Therefore, when creating the website, you should consider your audience’s preferences and interests. What you like the most in the design can be disliked by your audience. This is why studying your target users deeply is crucial before planning the web design process.
Be consistent throughout the design process
User experience (UX) and user interface (UI) mean two different things. The UI determines if UX will be positive for your audience. Therefore, you should build a consistent UI strategy.

Your site’s user interface should deliver the same experience on any device via multiple browsers. When adjusting your visual design to mobile, you will likely compromise on some branding elements or aesthetic tricks. However, try to ensure that a user recognizes your site and brand, no matter the device they use to access it.
Stay laconic when speaking to your users
When it comes to content creation, more is only sometimes better. Try to stay laconic when talking to your target audience. Prepare engaging and concise content that best describes your products or services. Recall the situations when you were a consumer looking for some product or service. Were you willing to read page-long descriptions that hardly told you something about the product? Probably, you were not. The same goes for your audience.

They want to get the information they look for immediately. When describing products or services, try to be precise and prioritize the website content. Put the most important information first. The additional information you want to highlight can be included below the main descriptions. This way, you will promptly provide the clients with the necessary information, and those willing to proceed with reading the content will scroll the page down for more.
Care about the readability of web pages
Refrain from overloading your written content and images with too much stuff. When looking at the pictures, the user should see what you are trying to sell. Besides, choose the fonts for your site wisely. Some fonts look very attractive and can differentiate you from the existing websites. However, too many fashionable fonts are often hard to read and perceive and are typically used when designing logos rather than in the content itself. For example, calligraphic fonts are often chosen to give logos a more elegant, distinctive, or creative feel, depending on the brand’s personality.
Those font colors should also be readable and chosen for your website design. As a rule, websites with white backgrounds use dark gray or black font shades.

Don’ts in web design
Don’t include ads on your website (at least at the beginning of your path)
Yes, including ads and promotions on a new website is an excellent way to earn money immediately. However, it irritates users and often makes them leave a site. Ads and promotions detract website visitors from viewing your website content. Also, they adversely affect your brand positioning. So, try to avoid them when implementing your steps.

Don’t ignore the performance issues
The average speed of page downloading is 3.21 seconds, if a website loads longer, visitors will simply leave. Consider it and avoid too heavy design elements on the site that may affect its performance. Also, optimize the code and keep it clean to increase the loading speed.
Don’t break the color contrast rules
In the web design process, check if the contrast of your background and text colors fit. You can do this by using contract-checking tools. To check the contrast, you need to enter the code of your text and background colors. The tool will evaluate the difference and give tips on improving the result if necessary.

Don’t autoplay videos
Today, you can hardly impress a user with a good product image like it was a decade ago. Therefore, more and more businesses use videos to grab user attention. For example, they present client feedback through video interviews, attach videos to blog posts, etc. If you also add videos to your website, do not autoplay them.
Users can view your site under various circumstances. For example, at the office, when walking, while resting, i.e., when they have no opportunity to watch a video. Let your clients decide by themselves if to tap the play button.
Final words about web design process
This article described essential things to know about the process of web design. Everything about creating a site starts with an idea in one’s head. However, one should take a long way to turn this idea into reality. High-standard website creation requires your attention, patience, and a lot of resources to build a truly competitive and appealing site.
To make your path more accessible, our team offered a 10-step guide to building a website. If you have questions left or look for a helpful hand, Limeup experts will be happy to assist you in reaching your goals.